This FAQ contains hints and tips for emulating the platforms that have
been encountered in the Lleague.
They're arranged in alphabetical order by platform... or you can use the links below:
nitebycandlelite
| Amiga | Atari 800 | BBC Micro | Commodore 64 |
| MAME | Sega Master System | SNES |
Recommended Emulator: WinUAE
Supported Platforms: Windows
Recommended Emulator: MaxUAE
Supported Platforms: Mac OS X
Recommended Emulator: UAE
Supported Platforms: Linux
Amiga emulation is a complex beast due to the variety of different hardware configurations the Amiga appeared in.
What I've done here is detail a basic Amiga A500 style emulation configuration which should work for most non-AGA games.
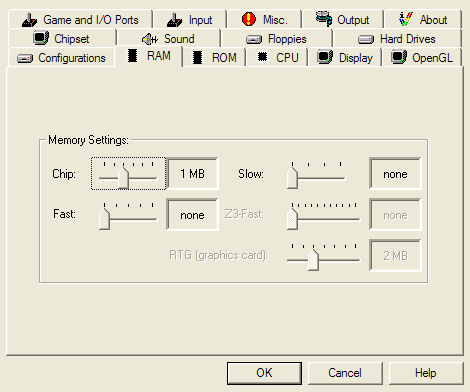
- First go to the RAM section of the GUI and set it to 1 MB Chip RAM, and nothing else
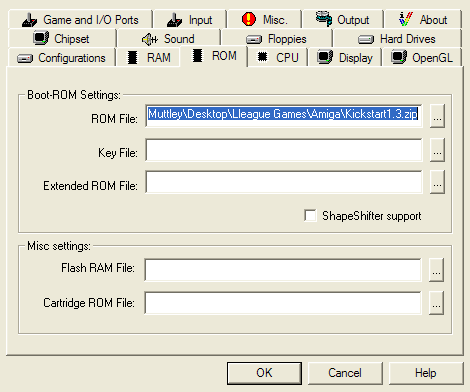
- Next, in the ROM section, set the ROM File to your Kickstart 1.3 ROM file
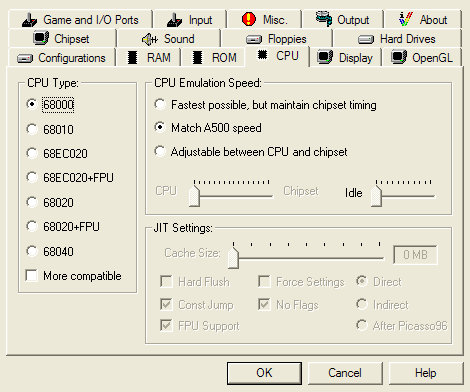
- In the CPU section, set the CPU Type to 68000, and in the CPU Emulation Speed select Match A500 speed.
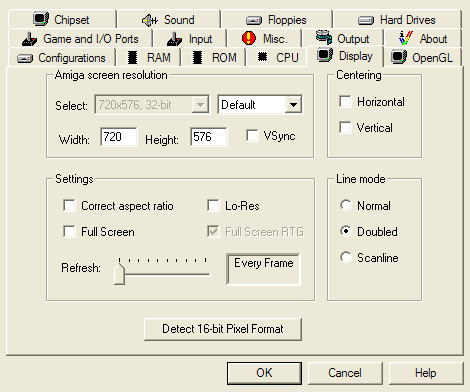
- In the Display section select either a Full Screen resolution of your choice, or a windowed resolution Width/Height of 720 x 576. Make sure the Line mode is set to Doubled.
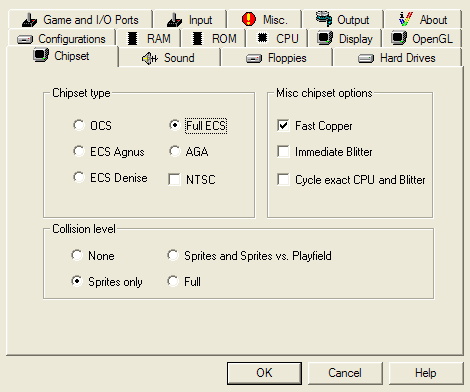
- In the Chipset section, select Chipset type as Full ECS. Select Fast Copper mode in the Misc chipset options and Sprites only in the Collision level options.
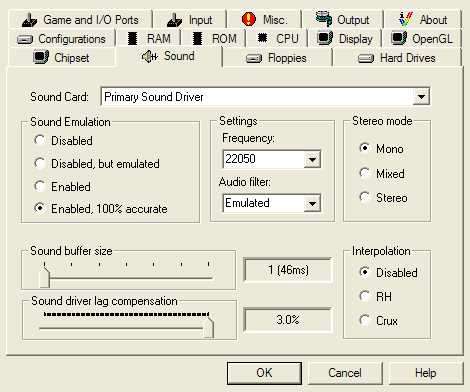
- In the Sound menu, select Enabled, 100% accurate, a Frequency of 22050, Audio filter Emulated. Stereo mode, Mono. Interpolation, Disabled. Depending on the speed of your PC you may need to tweak the Sound buffer size and Sound driver lag compensation to get the sound synchronising nicely with the game you're playing.
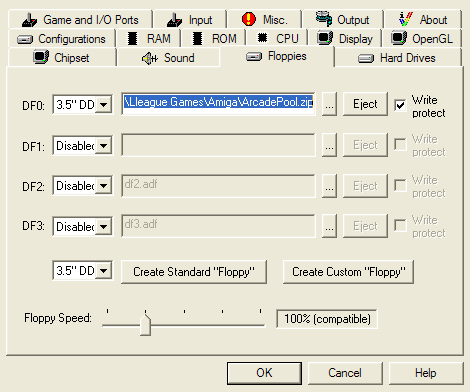
- In the Floppies section you can attach the ADF (Amiga Disk Format) images for the game you want to play. Some games support extra floppy drives, in which case you can attach all the disks required if the game has more than one. Support for this is dependent on the game in question though.
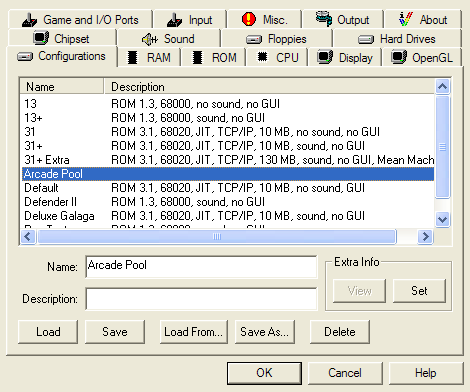
- Once you've set all these options it's a good idea to save the configuration so you don't have to enter them in all the time. This is done in the Configurations section. Just enter a new name and then press Save. Don't forget to reload your configuration when you launch WinUAE next time.
|
Recommended Emulator: Atari800
Supported Platforms: Unix, DOS, Windows, WindowsCE
Recommended Emulator: Atari800
for Apple Macintosh
Supported Platforms: Carbon (MacOS 8.6+ and OS X), Classic
Recommended Emulator: Atari800Win
PLus
Supported Platforms: Windows
These instructions are predominatly for the Atari800Win
PLus emulator. The other emulators should be similar.
Firstly, you'll be needing to download the Emulator
and BIOS ROM zip
files. After you've done that, unzip the emulator to a directory.
Open said directory, and then unzip the BIOS
ROMs into a folder inside the Emulator folder.
Does that make sense? No?
Tough. Next, double click the excecutable, and when the dialog
box pops up asking where the roms are, click "search".
This will bring up the directory structure, and here you need
to click the name of the directory you unzipped the ROMs to.
Click OK, and you'll notice that some of the
fields have been filled in. This is all done automatically, so
no need to worry about it being wrong.
Click OK again, and then you're ready to…
What? No, you can't play just yet. You've got to do more unzipping
first. If this has given you RSI, I apologise, but you really
should stop using your feet to guide your mouse.
Next, you'll need your Game ROM. Easy enough,
just download it, and unzip it to your ROMS folder.
Finally, to load your game in the emulator, click [File
| Autostart image], and select the appropriate image.
Click OK and hopefully the game will load to
it's title screen (or whatever the hell it's supposed to do).
Now, to set up your controls… Click [Input | Joysticks…]
and peruse the following dialog box. Now, follow these steps.
- UNCHECK the “Autofire”
box.
- Try to remember whether you have a PC joystick
or not.
- If you do, select it from the drop-down box next to “1”.
- Make sure that the “Autofire”
box next to “1” is unticked.
If it’s still ticked, untick it now.
- If you don’t have a joystick, check the Autofire
Box. Make sure it’s not ticked.
- Make sure that the Drop-down box that is headed “Autofire
Mode” is set to “off”.
- If you haven’t got a joystick, you’ll need to
define a keyset. This is the Emulator’s way of fooling
the virtual Atari into thinking that it’s being played
with a joystick. Click “Keyset A…”
- This will bring up a dialog box with some wiffle. Just click
OK, and then set your keys accordingly.
- Click “OK”, and then select “Keyset
A” from the drop-down box next to “1”.
- Ensure Autofire is NOT enabled.
- Click OK
You might have gathered from the above that Autofire
is Frowned Upon! :)
The following Atari800 keys are mapped like
this:
- F2 - Option
- F3 - Select
- F4 - Start
You may need some of these for specific games... |
Recommended Emulator: model-b
Supported Platforms: Windows
Recommended Emulator:
BeebEm
Supported Platforms: Windows, Unix
Recommended Emulator: Horizon
Supported Platforms: Windows, MacOS, MacOS X
The following instructions are for the model-b emulator, as this seems to be the quickest and easiest to get going.
- Unzip the emulator into whatever directory you want it installed in.
- Create a new directory called disks in this directory
- Run model-b.exe
- Select File -> Quickstart
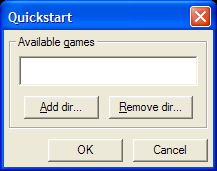
- Select Add Dir and navigate to your newly created disks directory and say OK. You should then see all the available disks in the previous menu.
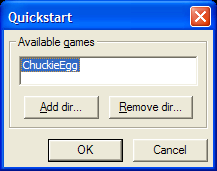
- Double-click the disk you want to load.
- That's it. It should now load and run automagically. :)
You'll need to use Alt-PrtScr and paste the results into a paint package of your choise to get screenshots from this emulator. |
Recommended Emulator: VICE
Supported Platforms: Unix, Windows, Mac OSX, Acorn RISC
OS, OS/2, BeOS x86
Recommended Emulator: CCS64
Supported Platforms: Dos, Windows, Linux, Unix
The following instructions are for the VICE
emulator. The other emulators should be similar.
Don't we all love the C64? Yes, yes we do. Unless it wins a poll
against any other game on any other system, in which case we'll
moan a bit.
But, for the most part (and the purpose of this FAQ) we all love
the Commodore. Period.
Right, to participate in the C64 shenanigans you'll need a toilet
roll, some empty egg boxes, and lots of PVA glue.
First, here's one I made earlier.
…
…
…
Oh, alright.
First off, you'll be needing an emulator, as always. This, for
the multiple platformy goodness, will be VICE.
After you've downloaded that, decompressing it (or for all you
Linuxheads out there, I suppose you'll need to compile it, hm?)
into an easily-accessible folder would be your next logical step.
Now, after you've done that, you should be downloading your game
ROMfile. You can get the relevant ones from Llamascores.
You'll probably have noticed that when you unzipped VICE, you
were presented with multiple programs, instead of just a Commodore
64 emulator. Well, VICE appears to be the daddy of all old Commodore
emulators, emulating the PET, C64, C128, VIC-20…
Anyway, interesting information aside, we're going into dialog-box
world once again… stick your gamefile somewhere easy to
remember within your VICE folder (maybe a directory labeled "roms"
(or "romz" if you're t3h l33t, or just trying to be
t3h funny) and decompress it.
Now double click the C64 version of Vice, and click [File
| Autostart disk/tape image…]. This will bring
up a dialog box. Navigate your way to t3h rh0mz folder,
and double-click whatever it is you want to play.
This should make it work. Obviously, your joystick won't work
because you haven't set it up yet (ha!) but there'll be C64 emulation
on your computer, at least.
To set up your controls, click [Settings | Joystick Settings…],
which will bring up yet another Dialog box. If you have a pad/stick,
set the drop-down box headed “Joystick in port #1:”
to “PC Joystick #1”. If you are without
stickage, then you’ll be wanting to configure a Keyset.
A Keyset is a way of fooling the computer into
thinking that the keys that you’ll be pressing on that there
keyboard are actually joystick commands. Set the “Joystick
in port #1” field to “Keyset A”,
and then click “Config Keyset A”.
Set up your desired controls, and then go back to your game.
If the game doesn’t appear to be picking up joystick commands,
hit [Ctrl+J]. This effectively nips round the
side of your virtual C64, and rips the virtual joystick out of
it’s virtual joystick port, and bungs it in the other one.
The Commodore was funny about which port the stick needed to be
in, sometimes it was 1, sometimes 2.
It’s virtual cousin is no different. Either way, this should
enable it to work.
To take a screenshot: hit [Alt+C]. This will
bring up yet ANOTHER dialog box, with the option of where
to save it and as what format: I recommend PNG,
for the least amount of pissing around.
And you’re done.
Addendum: Recording Games with VICE
To record a game with VICE, first make sure you have the latest version (v1.15 at time of writing).
In the Snapshot menu, select Select History files/directory, then navigate to/make the directory you wish to store the recording in. The filenames default to start.vsf and end.vsf which is just fine.
Then load your game as normal.
When you want to start the recording, go to the Snapshot menu and select Start/Stop Recording History.
Play your game, and when you're done go to the Snapshot menu and select Start/Stop Recording History again.
When submitting the score/recording, zip up the directory containing your recording start and stop files, and name the zip in the usual format (game_name-score-player_name.zip), and attach to your post as usual.
|
Recommended Emulator: MAME
duh!
Supported Platforms: Win32, MacOS, Unix
Remind me how to post a screenshot again...
Download MAME. www.mame.dk
is a mirror for all versions of MAME, be it Linux,
Mac or Win32 you're after.
Decompress/compile/shake an apple at the file you've just downloaded,
and stick it somewhere easy to access.
Once that's done, download your appropriate ROM
from Llamascores and then stick it in the \roms\
folder. It can stay zipped up, MAME can decompress at
will.
That's the easy part.
Next is the slightly tricky part... Load up
your version of MAME, and refresh the gamelist
however you do it (in Windows it's F5, in any other OSs I'm not
so sure), and select the list of "Available"
games (IE ones that you have available to play on your computer).
All the ROMs you downloaded from Llamascores
should be available. To play one, double click it.
If it asks you to type "OK", do as
it says. If it asks you to "Press Any Key",
also do as it says.
When you get into the actual game, you may well notice a seemingly
corrupt display. Don't worry about this, as MAME
emulates all the shiz that the cabinet would have done, so it's
just going through the boot-up motions.
To insert a coin (!) Press 5. To start a one-player
game, it's generally 1.
You'll probably notice that your joystick isn't
working. That's because you've not configured it, and I'm
really annoying, so when I write these FAQs I make it
so you want to break my neck before said emulator
is anywhere near useful.
So, to quit the game and set up your joystick, first
hit Esc. That'll dump you back to the GUI.
Then, click [Options | Default Options | Controllers]
and check the "Enable Joystick" box.
Re-load the game, and all should work.
To take a screenshot in MAME,
you just press F12 and a sparkling .png
image will be saved in the \snap\ directory
of your MAME folder. To make a recording,
right-click on the game you wish to play, and
select "Play and Record input". This
will then bring up a dialog box, which will ask
you what you want to save the file as. Once you've
decided that, the game will start. The high-scores that were once
there won't display on a recording - don't worry,
they'll still be saved, but recordings don't use them for some
reason.
That should be it.
Go on.
Play.
|
Recommended Emulator: MESS
(Multi Emulator Super System)
Supported Platforms: Win32, MacOS, Unix
I'm already assuming that you've downloaded this, and unzipped
it to a folder, yes?
You haven't?
Go do it, you lazy sod.
Right, now it's all nice and expanded, you'll be needing some
files: The BIOS and whichever game you'll be playing.
Open up your MESS folder and look for the subdirectory called
"bios". Bung your BIOS file in that folder (like it
wasn't self-explanitory enough anyway) and then get your gamefile.
You can leave both BIOS and Game ROMs zipped up, so you don't
need to mess around extracting to folders.
Then grab your gamefile, and then navigate your way into the
"software" folder in your MESS folder. Create yet another
folder called "sms" and stick the gamefile in there.
After all that, load up the MESS GUI version. Before you start,
you'll want to do a couple of things. The first will be to enable
your screenshots... Click "Options"
then "Default System Options...". Click
the "Miscellaneous" tab, and then uncheck
"Use new UI". Second, if you have a
gamepad, or joystick or some sort of gamery utensil, then click
the "Controllers" tab and check any
relevant boxes (you probably will only need the joystick one though).
Click "OK" on the properties dialog bux and click "available"
in the leftmost panel. This should bring up a short list of machines.
Select "Master System II - (NTSC) US/European BIOS with Alex
Kidd in Miracle World" and finally, double-click the game
you want to play.
To take a screenshot of the game you are playing,
hit F12. This will save a .png file into the
/snap/ directory in your MESS folder.
To take a recording of the game you're playing, you'll have to
exit the game you're currently playing. Go on. Hit ESC.
Now you've done that, select the game you wish to record you
playing, then... click "File", then
"Play and record input". Specify where
you want to save it and what the filename will be in the dialog
box that appears, and then click "OK". The game will
then start.
The only difference is that your moves are being logged in a
file, which will be saved where you specified, e.g. the /inp/
folder in your MESS directory.
|
Recommended Emulator: ZSNES
Supported Platforms: Win32, DOS, Linux
Recommended Emulator: SNES9x
Supported Platforms: Win32, DOS, Linux, Mac
Right then, as always, you’ll need your ROMfile,
and your Emulator: These can (as always) be obtained
from llamascores.org.
First, unzip the emulator into some sort of memorable
location (desktop/pr0n/boobies/ may be a good place to
start). Then, get your ROMfile and unzip
that into the same folder. Or, if you’re one of these organised
types, make a folder called “nipple close-ups”
and put all your ROMs in there.
Now, to load the Emulator, double click it.
You didn’t need me to tell you that, but for the purposes
of integrity…
After you’ve done that, you’ll be presented
with the GUI. Pretty, isn’t it? Anyway, now you
want to click [options], followed by [control options].
No, really. You do.
Bear in mind that the SNES has six buttons by
default, not including “Start” and “Select”
and quite often you’ll need all six to
hand, so it is recommended that you either have a six-button
gamepad or you have a comfortable arrangement on the keyboard.
So, to set the controls: Click [Config | Controller
#1] and then select [Keyb/Joystick]. Click [Set
Keys], set your keys, and click [ok].
Once you’ve done that, you can either go and do
something else, and make this whole process a waste of
time, or you can load your ROM and let it do it’s ROMmy
thing.
To load the ROM, click [File | Open] and find it using the dialogue
box that appears. It may well be in your “nipple
close-ups” folder, don’t forget. Once you’ve
located it, double click it and it’ll automatically load
and run.
The key you’ve defined to the Start button
will do the trick for getting you through most menus, and something
of note: The A button is normally to confirm
things, and the B button normally cancels
things.
Screenshots will have to be done by a screengrab
in your native OS, Windows is [print screen]. As far as I’m
aware, there’s no screeny function.
And, I suppose that’s it. Just don’t let
your other half see that directory tree… |
|